
(Images in the feature above, from left to right: “Chameleon”, “Ice Cream Truck”, “Onna-bugeisha Helmet” Modeled by Kent Floris, “Greenie Genie” Modeled by Nina Tarasova, Illustration by Alli White)
Lead Look Development Artist
Twitter: @iLoveTexture
Instagram: @NikieMonteleone
Portfolio Website: www.NikieMonteleone.com
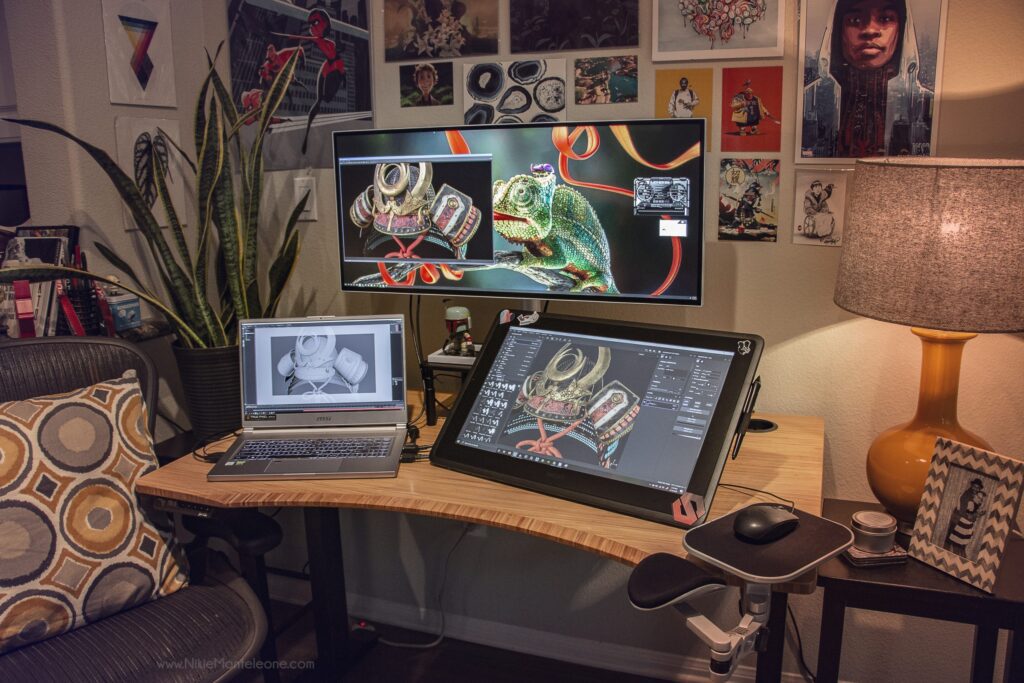
Discover the art of Nikie Monteleone as she walks us through her creative process while working on the very powerful MSI P65 Creator laptop, equipped with an RTX2070, partnered with her Cintiq 22, Pro Pen 3D and Substance Painter.
First, tell us a bit about yourself.
Hello! I’m Nikie Monteleone, and I’m a Lead Look Development Artist at Nickelodeon Animation Studio. Previously I was at DreamWorksTV, Laika/house and their spin off studio HouseSpecial. In the past decade of being in this industry, I’ve worked on a few award winning TV series, and animated short films including The Alchemist’s Letter, Being Good and most recently SUBSTANCE directed by Jamaal Bradley. On the commercial side, if you saw an M&Ms spot from 2012-2017, chances are, I worked on it! I’ve also had the pleasure of collabing on spots for International Delight, Mastercard, Fox Sports, Chipotle and Boom Beach for Supercell. I’m humbled by features in 3D Artist Magazine & 80Lvl, and have given talks at both Substance Days for GDC and SIGGRAPH for NVIDIA. What I’m most proud of though, is having my piece “Chameleon” chosen to be a splash screen for Substance Painter! Phew… I’m looking forward to a vacation at some point but for now, I’m always thinking about the next project!
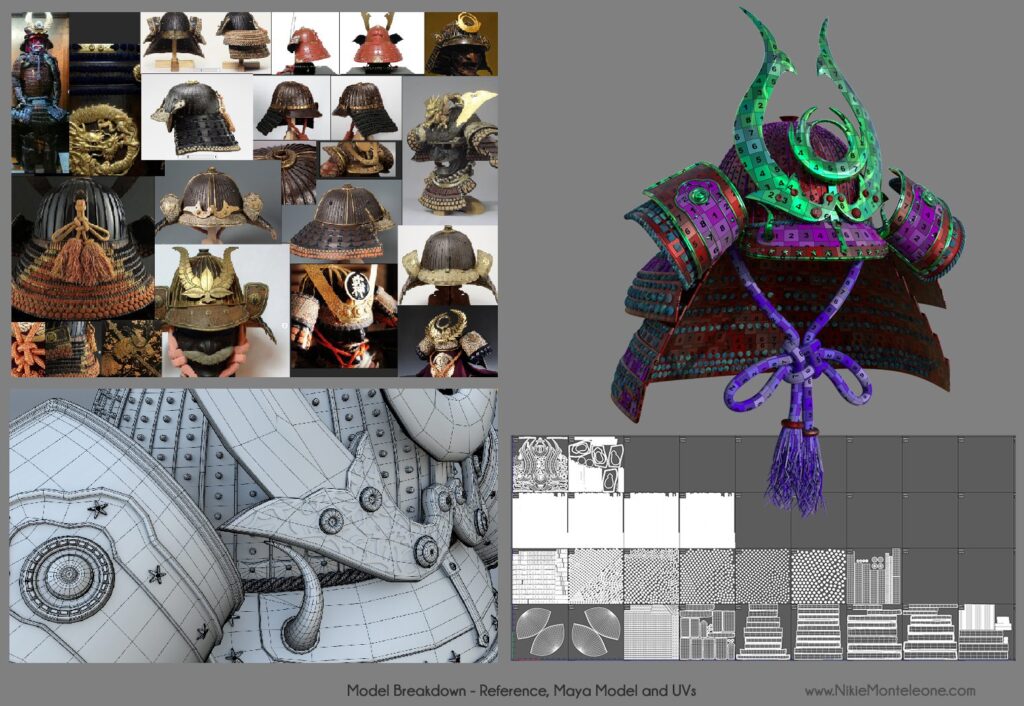
OK let’s dive right in, walk us through how you created the “Onna Bugeisha Helmet”
My workflow is very much like baking cake. You need all the right ingredients, the perfect measurements of these ingredients and you need a stove to bake them all in. There are various types of mixing bowls, spatulas, and ways to decorate but you just need to find the ones that work for you and fit your taste! During the webinar, I will dive deeper into the below steps, tips and tricks used but for now, here’s a run down!
But first, the hardware.
Pro Pen 3D has been a game changer. I’ve played around with setting the 3rd button to Maya .mel or .py scripts, rotating my lights in Painter and lately to the “P” key for the eyedropper. Having the 3rd button click perform processes I do over and over again has been a nice boost in productivity.
Wacom Cintiq 22” Drawing directly on the surface of my asset, is just so engaging for me as an artist. It really puts me in the zone! It’s an industry standard tool that pros use but affordable enough to use at home. It’s very sturdy, comes with an adjustable stand, the screen stays cool and it’s very quiet.
MSI P65 Creator laptop with NVIDIA’s RTX2070 I never thought I’d be able to efficiently use Adobe Substance Painter on a laptop but the MSI P65 Creator equipped with NVIDIA’s RTX2070 has surpassed my expectations! Maps bake at fast speeds with NVIDIA’s new RTX capabilities and navigating the helmet asset, which has 22, 2K texture sets, was surprisingly painless. I have both my Cintiq and 2nd monitor plugged in for ultimate productivity.
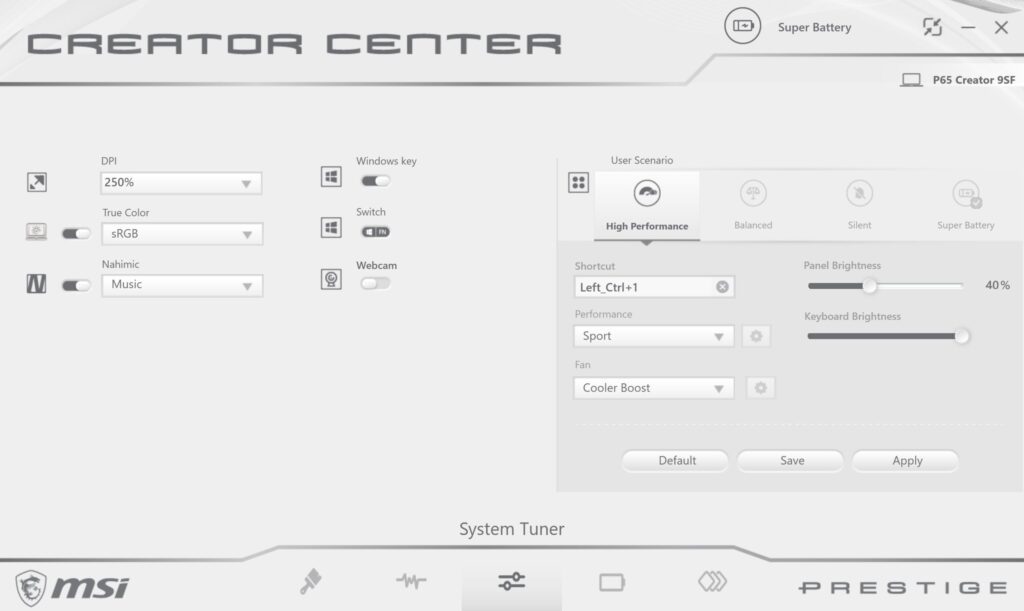
MSI Quick tip!
Open up Creator Center to monitor your laptop’s performance while working in various programs. I suggest navigating to “High Performance” under the System Tuner tab and switching the fan to “Cooler Boost” if you’re using GPU heavy processes in programs like Substance Painter or rendering with Arnold on the GPU.
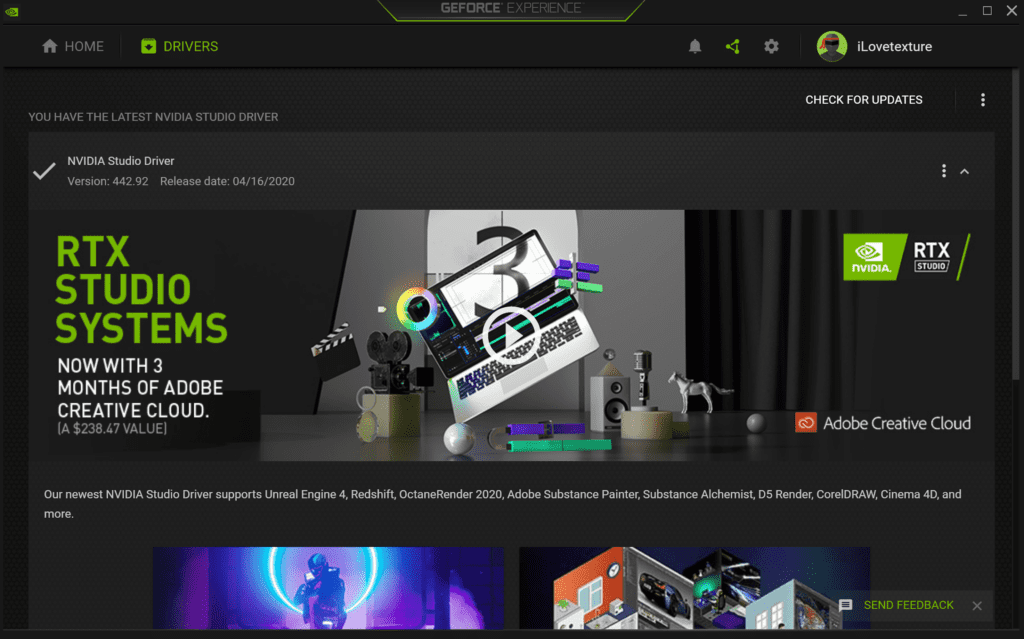
Automatically update Drivers with Geforce Experience
OK we are set up with hardware, let’s get into the creative process!
What are three important things we need before we can start texturing?
Real World Reference (Yes, even if it’s a stylized piece.) A Solid Foundation. You need a low resolution mesh to paint on and if you want to get fancy, a high resolution sculpt to grab details from. Lastly, a good set of UVs that work well within Substance Painter. Texel density is key. This means every face on your model within the same material should take up the same surface area in your UV space. For example, note how all the numbers are the same size. This will really allow you to take advantage of all the great procedural tools within Substance Painter.
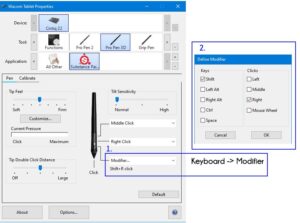
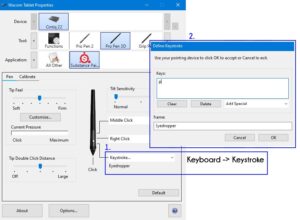
Pro Pen 3D Tip for Maya! Adding python or mel to the 3rd button. As an example I’ll walk you through setting the 3rd button to delete history and freeze transforms at the same time.
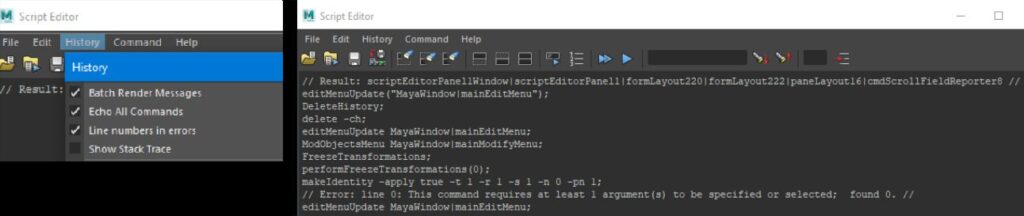
First open the script editor, I suggest deleting everything at the top so you can start fresh.
Turn on “Echo All Commands” under the History tab (Left). Now perform the operations of deleting history and freezing transforms. Then turn off Echo All Commands. Leave this window open.
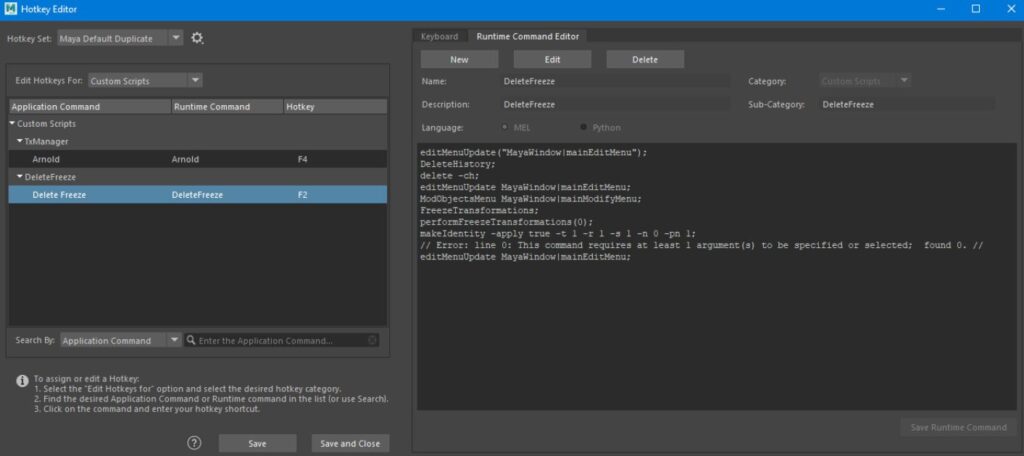
Now navigate to Windows -> Settings/Preferences -> Hotkey Editor. Add a new Runtime Command, set to MEL and copy paste what’s in the script editor to the Runtime Command Editor as shown below. Set a hotkey as shown on the left, in my case I chose F2.
Don’t forget to hit Save Runtime Command first (bottom right) and also hit save (bottom left)!
Now navigate to the Wacom Tablet Settings and set the 3rd button to be F2 for Maya.
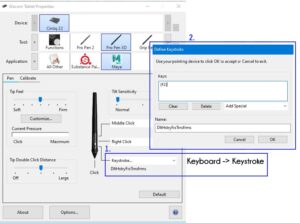
No more clicking through menus for something you do over and over again. Possibilities are endless!
Time to open Substance Painter
The first thing you want to do is bake mesh maps. Because the MSI laptop is equipped with NVIDIA’s RTX 2070 you have the power to utilize the new texture baking feature within Substance Painter. To put it simply, it’s much faster than ever before! More info on that here: An RTX-tra Substance Painter Feature
Mesh maps are the result of baking data from the model’s shapes that drive many of the procedural processes within Painter. You then have access to utilize these maps later on when developing the look of your asset. For instance, I will oftentimes use the curvature as a mask for edgewear on metal surfaces.
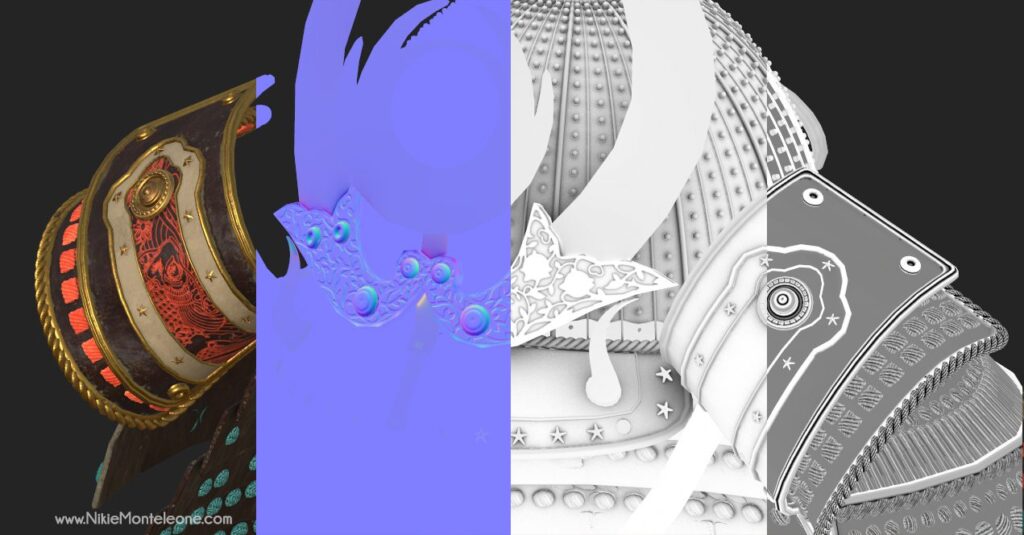
Inside Substance Painter’s viewport
(From left to right) Material mode, Normals, Ambient Occlusion and Curvature
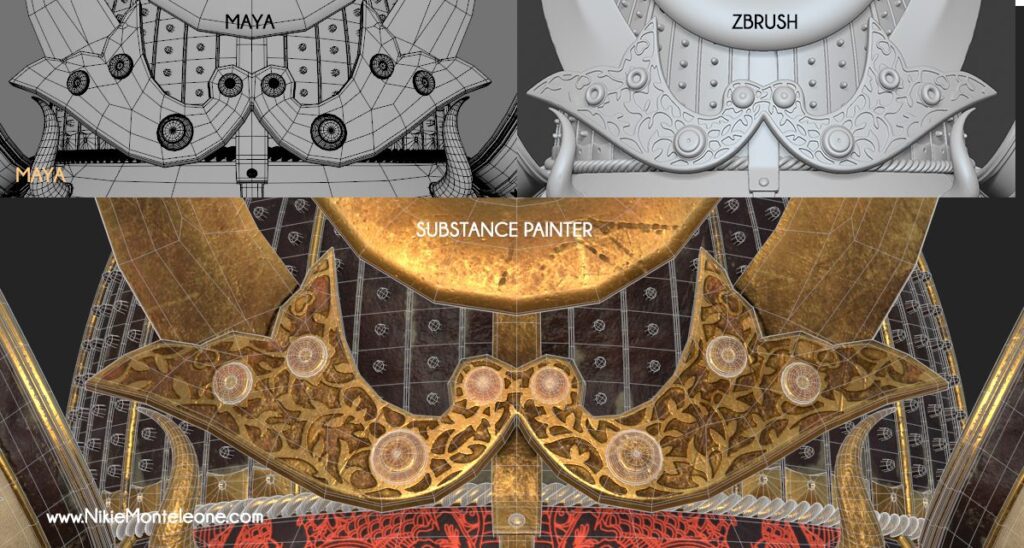
After we have the mesh maps baked, we are now ready to start “decorating the cake”
The Fun Part
Phew, we are finally ready to paint! It’s great practice to pull up one of Substance Painter’s sample projects and just practice mimicking what you see in the real world. It’s great to have these in place before you start and forces you to learn new procedures and find buttons you may never knew existed. These few examples are saved to my shelf as “Smart Materials” so I can pull layers from them at any time, for any project.
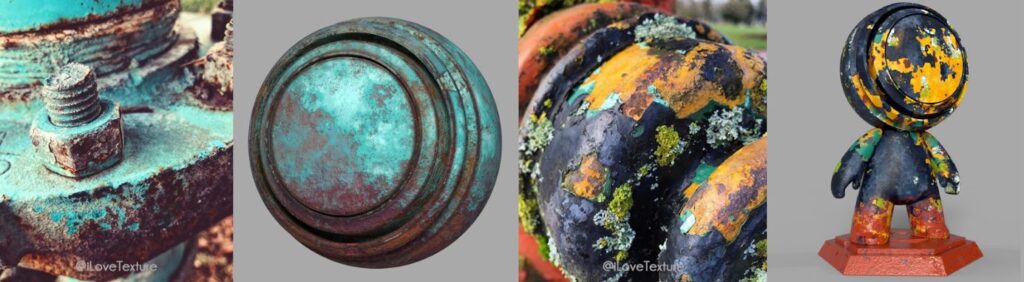
Real World reference from Nikie’s instagram account dedicated to textures “@iLoveTexture”
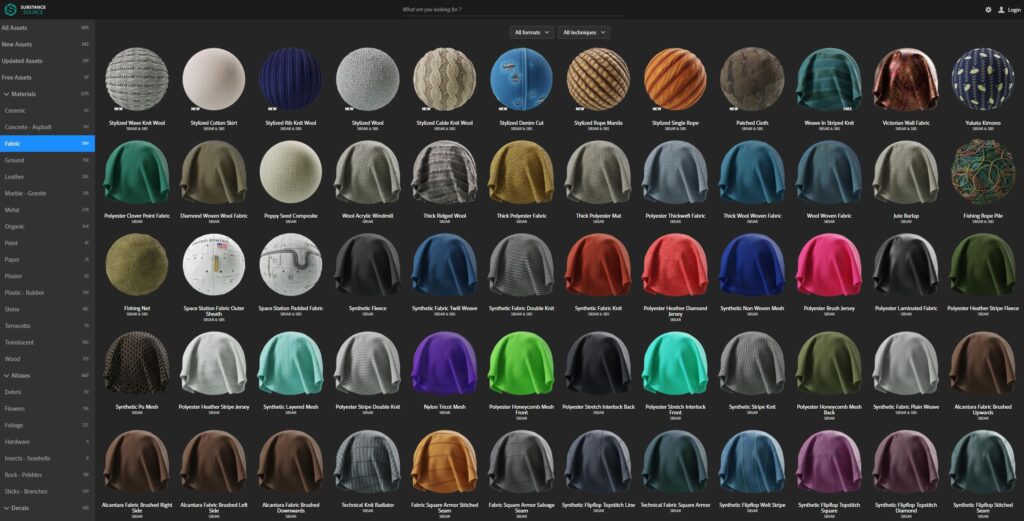
The huge library of source materials that come with Substance Painter is a great place to start. Simply drag and drop a material into the viewport or the layer stack. I also suggest checking out the Substance Source library for thousands of different materials to download.
Usually, I will start a project by blocking in bigger shapes of color. Quick Tip: If you squint at your design reference and your Substance Painter block-in, they should roughly look the same. Get the contrast in there early on and focus on details later. At this stage, I rely pretty heavily on fill layers, default materials in the library and the baked maps. Hand painting in the final touches comes last.
Block-in colors on left and final Substance Viewport Materials on right
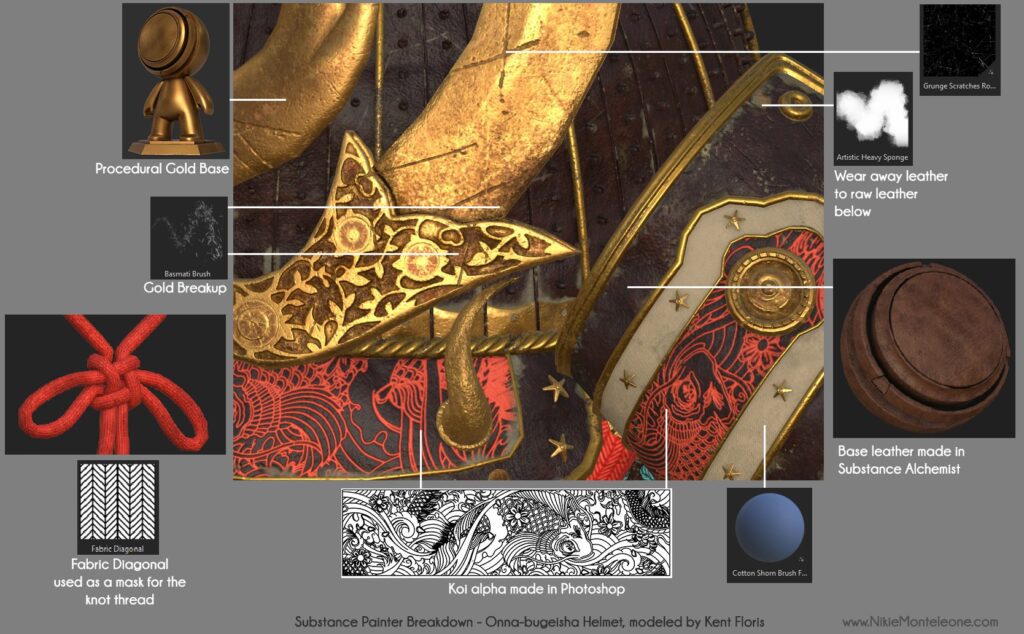
Another handy tool in the Substance Software Library is Substance Alchemist which was used to help create the base leather material from one single leather image. The gold base was made before I started so I didn’t get caught up in hand painting the details. If you’re interested in the breakdown of this shader, it’s available for purchase in my ArtStation Store.
What are some of your favorite Substance features and do you have any tips?
Pro Pen 3D Quick Tip for Substance Painter: When at the blocking stage, I usually set the 3rd button to Shift + Right Click to rotate my lights. (Shown left) When painting, I like to set the 3rd button to “P” for the color picker since that hotkey isn’t near my left hand on the keyboard.(Shown right)
Another great feature is the ability to bake down high res information from something like a ZBrush sculpt to get the finer details on my low res model. The amount of information I can get onto a low res surface keeps the file size down and workable. This also lets me get away with no displacement added to the shader so render times stay manageable.
Substance Painter viewport has no high res mesh but we can still see the details when painting
OK, you have a painted model, what’s next?
Staging the Camera, Lighting the Asset & Rendering
And then don’t forget to share it on places like ArtStation, Instagram and your
personal portfolio website!

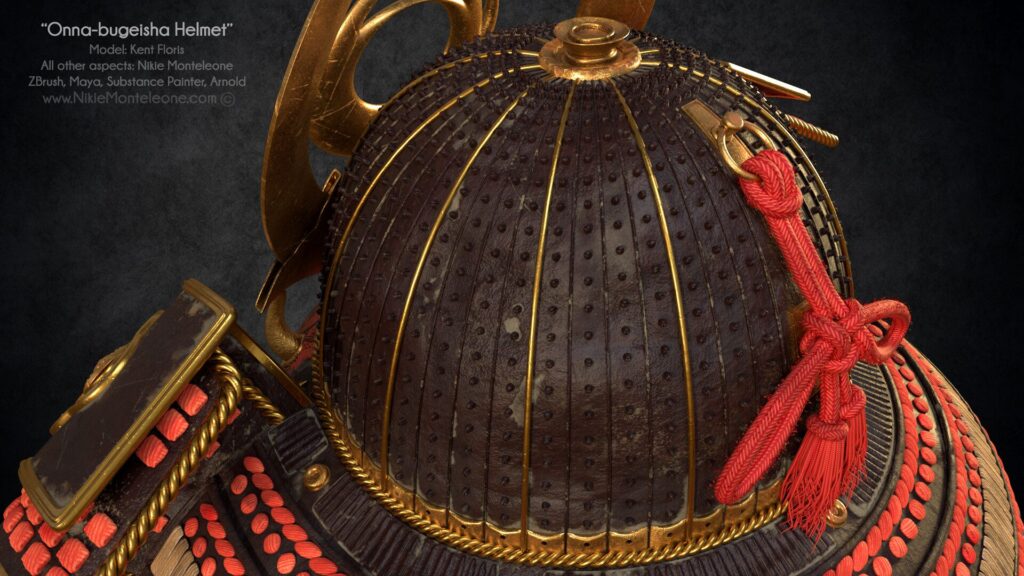
The “Onna-bugeisha Helmet” piece was lit with 2 area lights and the same HDR used in the Substance Painter project file. It was rendered in Maya with Arnold on the GPU and has a total of 22 UDIM tiles resulting in 88, 2K files. I will dive more into this during the webinar but all in all, I was getting great results with both CPU & GPU rendering on the laptop as long as I was monitoring with Creator Center.
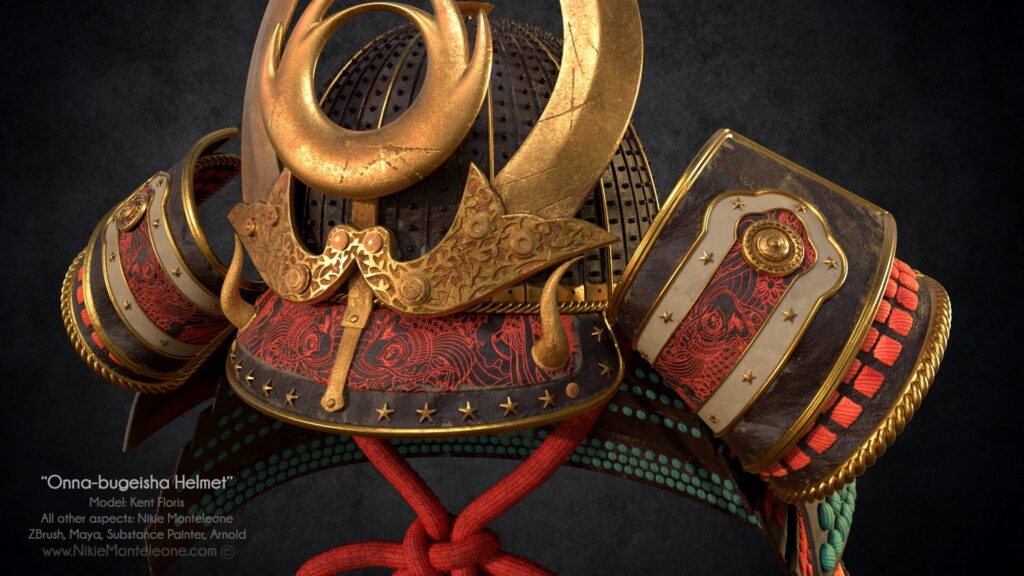
“Onna-bugeisha Helmet” Model by Kent Floris.
About the Author:

Nikie Monteleone is currently a Lead Look Development Artist at Nickelodeon Animation Studio. She has previously worked with clients such as Laika, DreamWorksTV, Adidas, Nike, & M&M’s to name a few. She currently resides in LA and is owned by one crazy Boston Terrier who shares her love for any & all types of cheese.


